If you are new to wordpress, you are probably wondering how to efficiently get images up to your blog/website without bloating it up and slowing it down.
You’re in luck if you have a Canva pro account, and already manage most of your digital products and photos there.
So far I have found that Canva is the best tool for image optimization for the web, hands down. Not only can you source stock photos and video, but you can resize them, repurpose them for different platforms and optimize them entirely.
Below is a simple guide to getting the right dimensions, quality, file type, and file size for your WordPress images.
Optimizing Images for Blog Posts
So you have a image that you are going to feature on your blog.
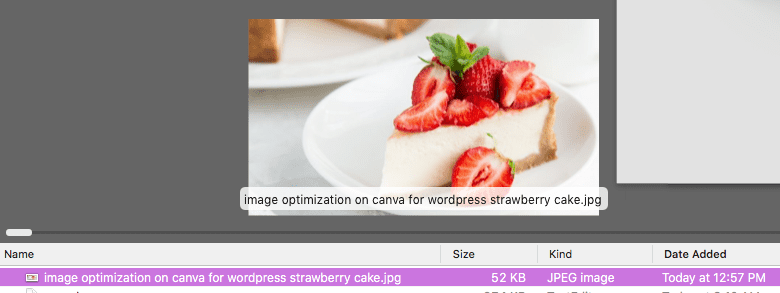
Say, It’s a beautiful pixel perfect photo of a cake with strawberries. There are fine details showing the fuzz and seeds and a natural background bokeh effect.
You upload the image and it takes forever to load on the front end, or may not even upload to the media library as it is.
This has happened to me, and if you don’t optimize your images it will happen to you. So, how do you optimize an image?
Follow these prompts in CANVA to get the best image optimization results for your WordPress blog:
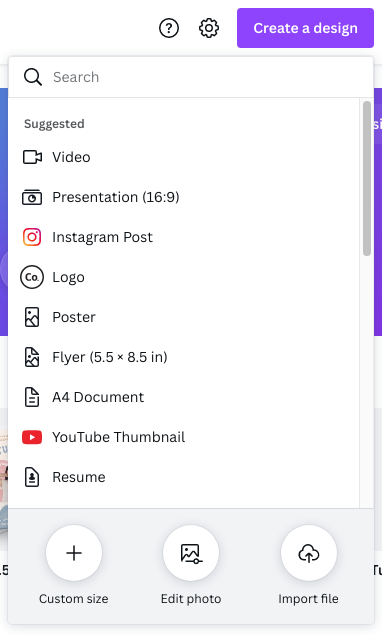
1. Create a new “presentation” in Canva (the default dimensions are 1920 x 1080 px) This is the standard design size ratio for computer viewing (also known as 1080p)

2. Select and drag and drop your favorite stock image (landscape orientation) to the canvas, so that it snaps to the grid.
3. Make sure to name your file here (on Canva) with your keyword so that when you download the file, your alt tag reflects your file name as well.
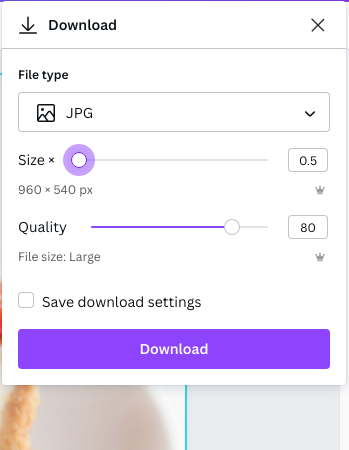
4. Select download, as a JPEG. Reduce the dimension by 1, and put the quality to 80%. This adjustment reduces your files dimensions to 960 x 540 px. These dimensions work well for website images in-context and as a thumbnail. It really works well for file size output.

5. Review your downloaded file size, and confirm that it is below 100kb, the lower the better (without sacrificing quality). If it still too high, follow the next step.

6. Use shortpixel.com to compress the image a little further, to get the file size as low as possible.
6. Upload your image to your blog post, as the fray turned image, or within the context of the blog post.
This is a fast and simple way to get good quality images perfectly optimized for your website. Not only do we address the proper file size here, but also the technical SEO.
It just so happens that the dimensions for the default presentation template are the right size in terms of file size. So most images that are optimized in this fashion, tend to save under 100kb file size.
Tips for images on WordPress
1. All image files should be less then 100kb, sometimes this may significantly impact the quality of the photo, and in those cases you can make an exception.
2. Dimensions for images should be prioritized when optimizing for images first, and then quality, filetype, and compression last. For example: for a hero image on your website you should size between 1,200 to 1,800 pixels in width. The height will automatically adjust to keep the proper ratio. Then you should pick the output format of the file: jpeg (easiest most common option), the quality of the image (no less then 80%), and check if further compression is needed.
3. If you are going to have multiple images on one webpage make sure that they are all optimized as they all are prompted to load and can slow down your website loading speed. This is especially important for the landing page of your website also known as the homepage.
Why should you optimize your images?
Large image files can impact your loading speed
Managing image files are tricky as it is, and if you don’t know the basics of optimizing your images for the web, you can negatively impact your websites performance.
Anything over 100kb in file size per image can be too heavy for web severs to transfer quickly to a calling client (end user).
Website page speed is actually a ranking factor as well, so it is essential that images are optimized before uploading every time.
This process may be tedious, but can become second hand nature after a few rounds.
